The Task Manager has been around for a long time.
The app gives you access to many functions that can help with your efforts to monitor, control and optimise your operating system. It can also be used to diagnose system problems by showing abnormal use of resources. High usage of CPU, Memory, network or disk usage can indicate problems whose cause needs to be found and reduced. If you are tweaking your system settings you will want to see how effective they are by reviewing the relevant categories.
Cool Geek Clues
Excel Dynamic Drop Down List
A basic drop down list is created by using the list function in the data validation. The list values can be created as items in the source list separated by comas or by putting a reference to a range containing them. This is great for a simple static list but becomes cumbersome if changes are required.
Below we start from this simple approach and go through to the full dynamic approach which uses a using the very flexible table functionality provided by Excel.
-
Select a cell
-
Go to Data on the top menu
-
Select Data Validation in the Data Tools section
-
From the drop down that appears select Data Validation
-
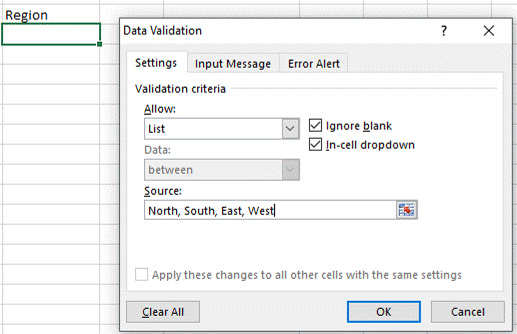
In the popup window select List from the Allow drop down
-
Type each item in the list separated by a comma
-
Press OK
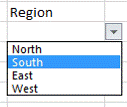
This is OK for short lists and has to be manually edited each time a change is made
Simple Drop Down List - From Range Selection
-
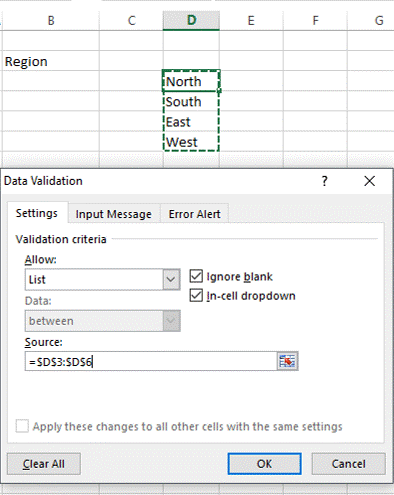
Enter the list in a range of cells
-
Follow the steps above to get to the Data Validation input window
-
Place the cursor in the source input box
-
Select the range with the list items and the address appears in the input box
-
Press OK
This is OK for longer lists but still requires manual editing of the range address if changes are made
Dynamic Drop Down List - Using a table as input
1. Create the Table with List items
-
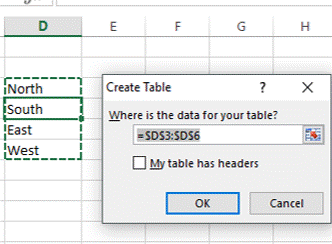
Create a list in consecutive cells
-
Press Ctrl + t
-
A Create Table dialog box will open. There is a tick box for My table has headers. If left unchecked it will give the table a default name of Column1. This name is editable and can be changed.
-
Press OK and a table will be created with banded lines1

2. Use the table range in your Data Validation dialog box
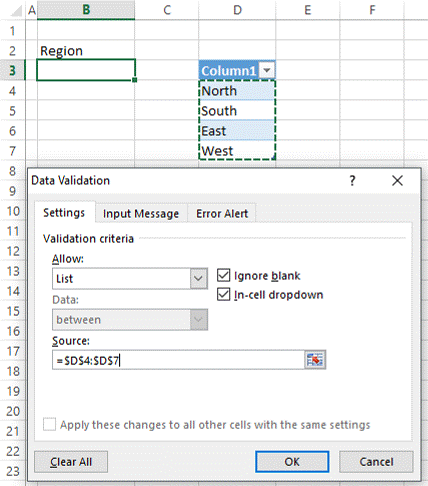
-
Open the Data Validation dialog box as shown above
-
Place the cursor in the source box then select the list range in the table. Note: DO NOT INCLUDE THE HEADER in your selection
-
Press OK
-
Your drop down is now populated with the values from the table

3. Testing out the dynamic drop list
Adding items to a table
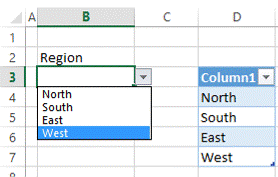
As Is
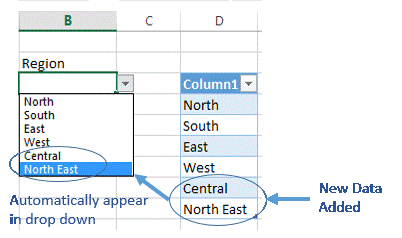
With items added to the table that automatically appear in the drop down without the need to edit
4. Removing Consecutive Items From A Table
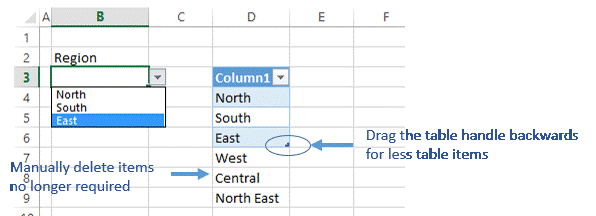
To make the list have less consecutive items drag the table handle backwards to the point where only the relevant items are shown. Those items no longer required are now outside the table. These old items must be manually removed.
5. Removing Individual Items From A Table

Additional Notes
1. The drop down list can be copied and pasted to as many cells as required
2. Tables and there use and manipulation in Excel is large topic and the use described above is only a small part of this functionality
Individual items can be removed from a table list by selecting the items and going to the Delete Table Rows in the Cells section of the Home tab. The drop down list is automatically updated. Inserting items in at any point in a table can also be achieved by using the insert selection in the same menu.
